

Chicken Parm Sliders + Video
This post may contain affiliate links. Please read my disclosure policy.
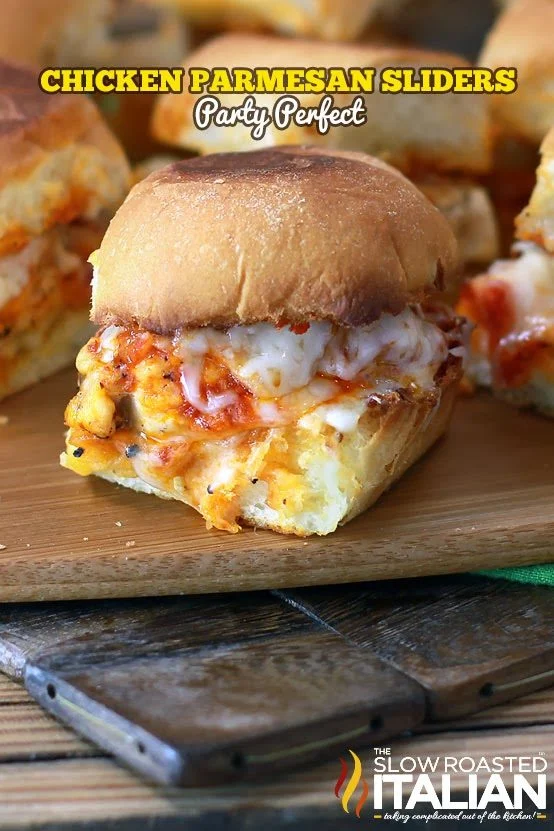
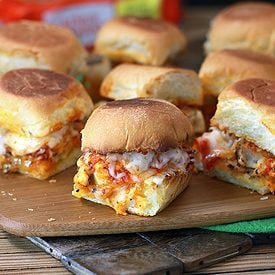
My Chicken Parm Sliders are stuffed with slices of pan-fried chicken, marinara sauce, and mozzarella cheese. Served on sweet dinner rolls toasted with garlic butter and topped with Parmesan to create individually portioned sandwiches, this simple chicken parm sliders recipe is absolutely heavenly and party-ready!!
Chicken Parm Sliders
I love the holiday season, having family over, and love love love game day parties.
Not too long ago, I was the type of gal who would spend all day in the kitchen with a few of my besties over to help with prep. Not anymore! Simple is now my middle name.
I also love little time savers in the kitchen. And when they can help me get ahead for a party? It’s a double bonus! Less time in the kitchen means more time to spend with my friends.
Something I’ve always disliked about making sliders is having to deal with all of the buns. Making everything individually tends to get a bit messy.
That’s not the case with these chicken parm sliders!! Everything cooks together and there is so much less mess.
When I figured out I could use dinner rolls to make 12 sliders at once and then cut them when I’m ready to serve my life totally changed… for the BETTER!!
I even elevate them a bit by toasting them with garlic butter and Parmesan cheese before I assemble them.
Paired with perfectly cooked chicken, homemade marinara sauce, and even more cheese, you’ve got yourself a picture-perfect chicken Parmesan slider recipe!
A few of my other favorite flavor variations to try are my root beer pulled pork sliders, cheesy sausage and pepper Italian sliders, and these mini Tex-Mex turkey burgers!
Ingredient Notes and Substitutions
- Chicken Breast – I went with chicken breast for my Parmesan chicken sliders as it’s inexpensive, easy to work with, and always comes out tasty when seasoned and fried.
- Unsalted Butter & Garlic Powder – For the dinner rolls. Brushing them in garlic butter before giving them a good toast will make them taste even better.
- Olive Oil – To pan-fry the chicken. It’s my favorite oil to cook with, but vegetable oil or avocado oil could also be used.
- Parmesan Cheese – Because these wouldn’t be chicken parm sliders without the parm! As always, I recommend grating the cheese fresh yourself.
Pre-shredded bags often contain anti-caking agents and don’t melt as well. - Marinara Sauce – I whip up a quick batch of my 5-minute pasta sauce! You could also use store-bought if that’s easier.
- Mozzarella Cheese – Becomes ooey gooey when melted, acting like a yummy glue that holds everything together.
Provolone or even Monterey Jack are some other options. - Hawaiian Dinner Rolls – The sweet and soft vessel that holds all of that saucy, cheesy goodness.
If you can’t find Hawaiian rolls at the store, you could also use regular slider buns or mini ciabattas.
Tips and Tricks to Make Perfect Chicken Parmesan Sliders
- Need a crazy fun and easy shortcut?
Try using chicken nuggets instead of chicken breasts. It’s much easier and they taste fabulous!
You can get the ones from the freezer section and fry them on your stovetop for a perfectly crisp chicken component.
- Use a serrated knife to evenly slice the rolls.
Grab a knife with teeth (like a bread knife) to slice the Hawaiian rolls in half without squishing them.
That way, you can saw gently back and forth rather than pressing down so they stay nice and fluffy!
- Two layers of cheese help with sogginess.
The marinara sauce, while definitely appreciated in this chicken Parmesan slider recipe, can cause the rolls to become mushy if you aren’t careful.
Prevent this by making sure to add a layer of Parmesan cheese directly to the bottom bun before adding the chicken, sauce, and mozzarella.
It creates the perfect base to keep the bread from becoming soggy!
- Broil for extra melted cheese.
To make the mozzarella cheese extra bubbly and golden on top, switch your oven to broil for the last 1-2 minutes of baking.
Keep a close eye on it to prevent it from burning and you’ll get that classic golden-brown finish so synonymous with chicken parm!
Prep Ahead
- Slice and bake the dinner rolls
- Prep and cook the chicken
Kitchen Tools You Will Need
- A Serrated Bread Knife and a big solid Cutting Board make prepping a breeze and are well worth the investment.
- Baking Sheets lined with Parchment Paper – Used for anything from cookies to roasting, a good baking pan will last for years.
- Non-stick Skillet – Everyone needs a good skillet. I use this almost daily for everything from cooking eggs to browning chicken and ground beef.
- Box Grater – As much as I love buying bagged shreds because it’s easier, freshly grated cheese melts down so much smoother and tastes better too.
Serving Suggestions
Chicken Parmesan sliders are perfect for parties and game day celebrations — I often pair them with mozzarella sticks and more marinara for dipping, Caprese sausage skewers, and some pizza dip!
They’re also a quick and easy option for a casual weeknight dinner.
Chad and I love them for an at-home date night, and I’ll usually serve them with a side of simple penne Pomodoro pasta and a big garden salad topped with homemade vinaigrette.
Storing and Reheating Parmesan Chicken Sliders
When cooled completely, place leftover sliders in an airtight container and store in the refrigerator for up to 3 days.
Use your oven to reheat so the rolls get nice and crispy again. Cover with foil and warm for about 10-15 minutes at 350°F. Remove the foil in the last 3-5 minutes or so to toast the bread.
You could freeze chicken Parm sliders (for up to 2 months), but understand that the bread may come out soft, or worse, soggy when frozen, thawed, and reheated!
Because they’re so easy and quick to prepare I suggest making them fresh whenever possible.
Chicken Parm Slider FAQ
Sure! Chicken thighs are actually known for being juicier than chicken breasts, making them a great substitute for Parmesan chicken sliders. Just be sure to slice them into even pieces so they cook evenly.
You may also need to add 1-2 minutes to the cooking time as they take a bit more time to cook through.
Soggy sliders seem to be an issue everyone runs into at least once!
Make sure to toast the buns well before assembling them to create somewhat of a barrier between the bread and the sauce.
And, don’t overdo it with the marinara — stick to about 1 tablespoon per piece of chicken.
Absolutely! Like I said, my chicken parm sliders recipe is totally party-ready!
You can cook the chicken, toast the buns, and store them separately in airtight containers in the fridge up to 1 day ahead.
Right before serving, assemble and bake for 5-7 minutes at 400°F until the cheese is bubbly. They’ll taste freshly made without all of that last-minute party prep stress!
Enjoy!
With love, from our simple kitchen to yours.
Don’t miss a thing! Follow us on
Facebook | Twitter | Pinterest | Instagram

Chicken Parm Sliders + Video
Ingredients
- 2 tablespoons extra virgin olive oil
- 1 1/2 pounds chicken breasts, cut into twelve 1/2-inch steaks
- 1/2 teaspoon kosher salt
- 2 teaspoons fresh cracked black pepper
- 3 tablespoons unsalted butter
- 1 teaspoon garlic powder
- 3 ounces grated fresh parmesan cheese
- 3/4 cup marinara sauce
- 4 ounces shredded mozzarella cheese
- 12 Hawaiian dinner rolls, or other slider buns
Instructions
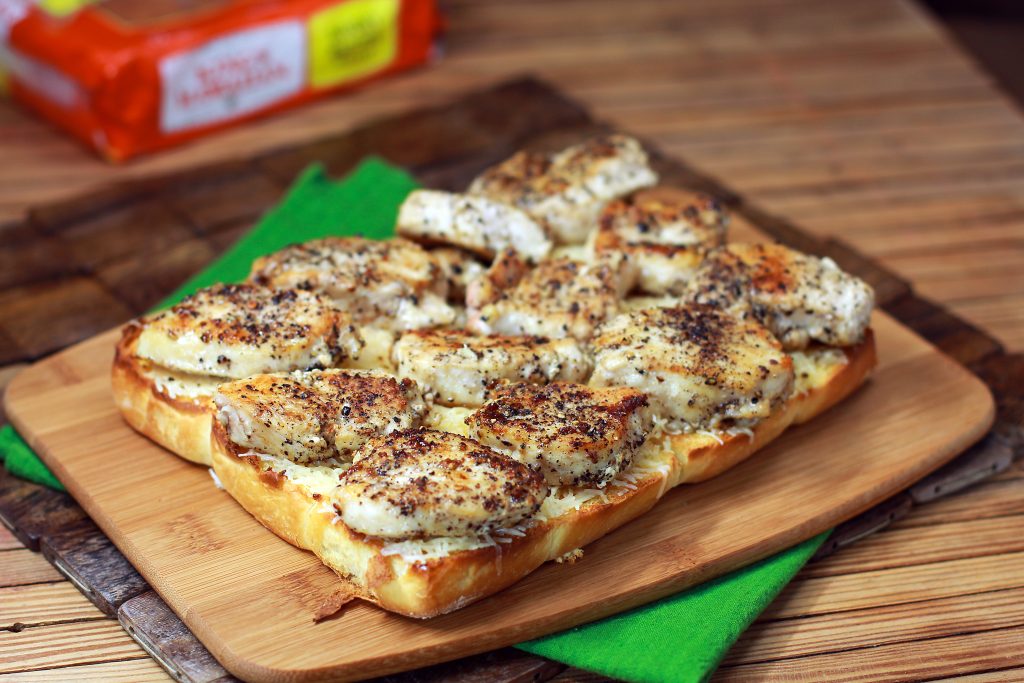
- Preheat oven to 400°F. Place rolls (keep them attached) on a cutting board. Using a serrated knife, cut rolls in half lengthwise (without breaking rolls apart). Open rolls and place tops on one side of a baking sheet and bottoms on the other side, cut-side up.
- Melt butter in a small microwave-safe bowl, then stir in garlic powder. Brush butter on insides of top and bottoms of bread. Bake bread for 8-10 minutes, or until bread is lightly golden brown.
- Prepare chicken by slicing the thickest part of the breast about ½” thick. Cut the thinner part of the breast into pieces slightly larger than the individual rolls.
- Meanwhile, warm a large skillet over medium-high heat. Drizzle with olive oil. Sprinkle chicken with 1/2 of salt and 1/2 of pepper. Cook until browned, flip and cook until cooked through, about 8 minutes total.
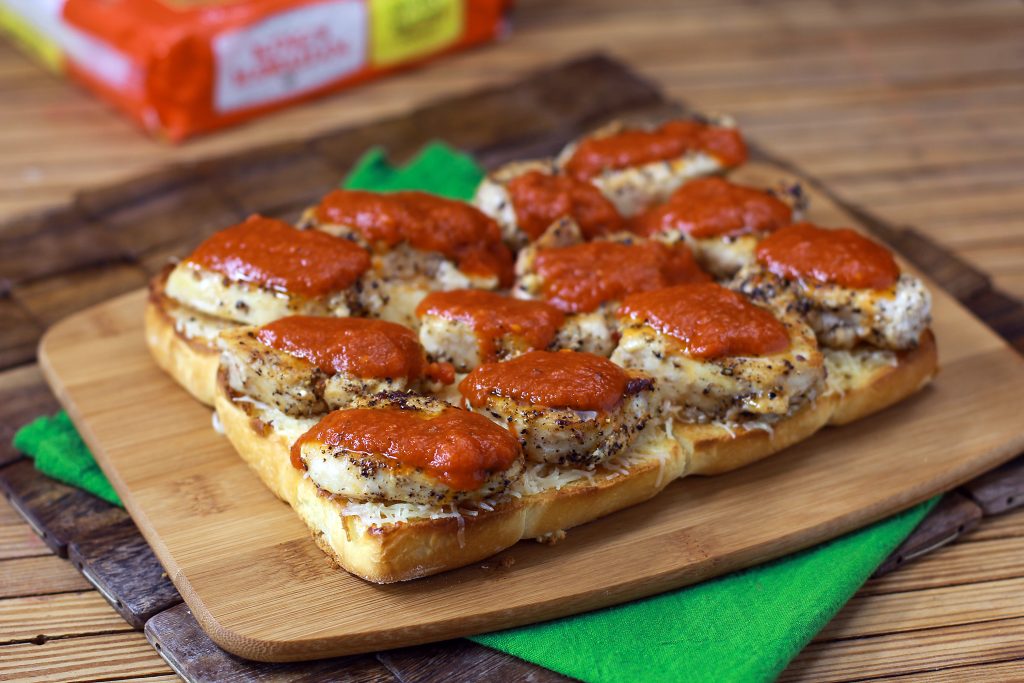
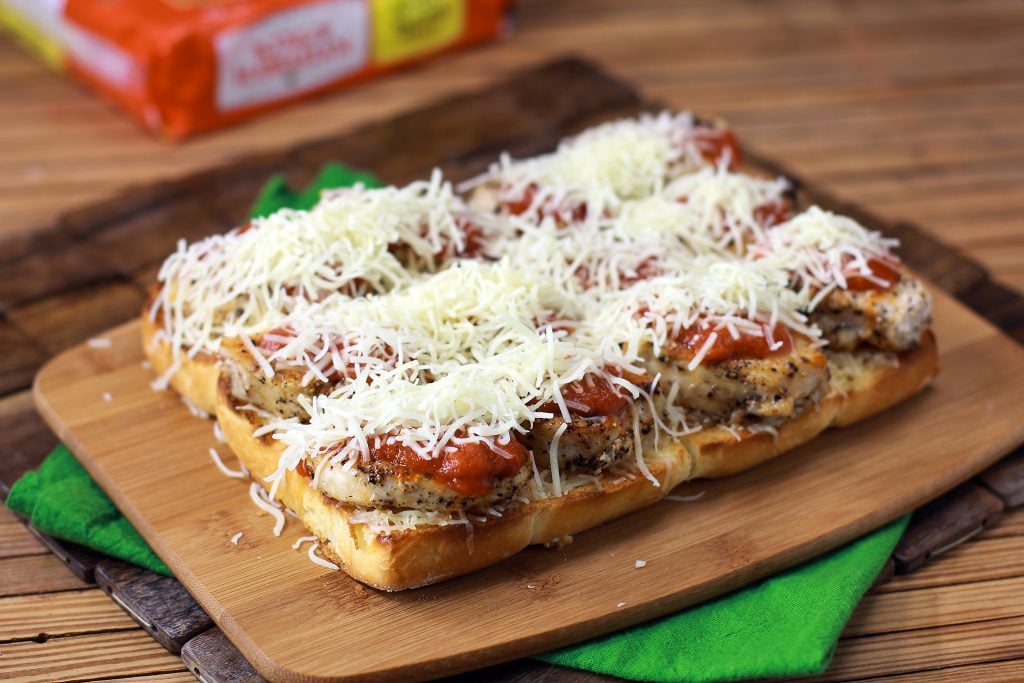
- Remove bread from oven. Carefully remove top halves of rolls and place on a plate. Set aside. Sprinkle Parmesan cheese over the bottom halves. Top with cooked chicken pieces. Drizzle each chicken piece with about 1 tablespoon of marinara sauce and top with mozzarella cheese. Bake 5 minutes or until cheese is bubbly and melted.
- Place top halves back on chicken. Cut into sliders, serve and enjoy!
Video
Nutrition
All nutritional information is based on third party calculations and is only an estimate. Each recipe’s nutritional value will vary depending on the ingredients used, measuring methods, and portion sizes.
Originally published October 2013. Updated and republished April 2025
Disclosure: Posts may contain affiliate links. If you purchase a product through an affiliate link your price will remain the same and The Slow Roasted Italian will automatically receive a small commission. Thank you for your support; it allows us to keep creating new recipes.

These look fantastic — love that you're able to assemble them before pulling apart the rolls to make the process a little more efficient! Love King's Hawaiian bread — always perfectly soft and fluffy!
Good luck with the contest : )
This just looks so good! We love Hawaiian rolls here. Potato bread = also winner. Melty cheese is so awesome, right? I want to try this.
I made these last night. Added a swiss cheese/mushroom, BBQ and a wasabi slider to the mix. So good, thanks for the idea!
So happy you loved them!
Look fantastically awesome – I'm a finger food lover – Pinning 😉
What an amazing use of King's Hawaiian bread! I am addicted to that stuff! And these sliders – perfection! I could just gobble these up!
This was awesome. Even though I used regular rolls and my oen marinara sauce, it came out delicious. I will def. Make it again. Thank you!
I just made these and they were fantastic!!!
best looking sandwich ever!
I made this tonight and everyone loved them. Thank you!
Wow….can you say perf for my superbowl party !
I've made something very similar to this but I used shredded rotisserie chicken (lazy way), then layered sauce and cheese and spices. Very good!
I've actually made these 3 times and loved them each time. Perfect as written, but I must say, I'm tempted to try the rotisserie chicken next time because I like being lazy too.
Sounds delicious, I plan on making them, but can the leftovers be frozen?
Sounds delicious. Plan on making them, but can you freeze the leftovers?
Love this idea! Wondering, though, if you could use boneless, skinless thighs instead of chicken breasts. Seems they would be the right size for the slider buns…
These look scrumptious! I can't find the video
Thanks for your help.
I used my insta pot and shredded the chicken! My family really liked it!
Tasty! I used the mini sub rolls:-)
I tried these. Added a couple slices of jarred jalapenos, for kick. DELICIOUS
400 degrees was entirely too high!! The entire batch burned black after 5 minutes!
Had to order take out.😞
Oh no, Linda! The recipe was tested before publishing and Donna makes the sliders regularly without any problems. Do you live at a high altitude? I do know that altitude can affect oven temperatures. Likewise, if you have a convection oven, it cooks hotter than a traditional oven. I have one and always set it to 25 degrees lower than what most recipes call for.
TSRI Team member,
Becca
Sliders are such easy quick appetizers or full meals. I love to make these when I’m making something for a work potluck or family event! Everyone loves them.