The Best Ever Challah Bread
This post may contain affiliate links. Please read my disclosure policy.
Rich egg bread made sweet with the addition of honey. Our “tried and true” Challah recipe has been tested for years and is always amazing and absolutely impressive whether baked in a bread pan or 6 braided (as pictured). It really is the best ever!
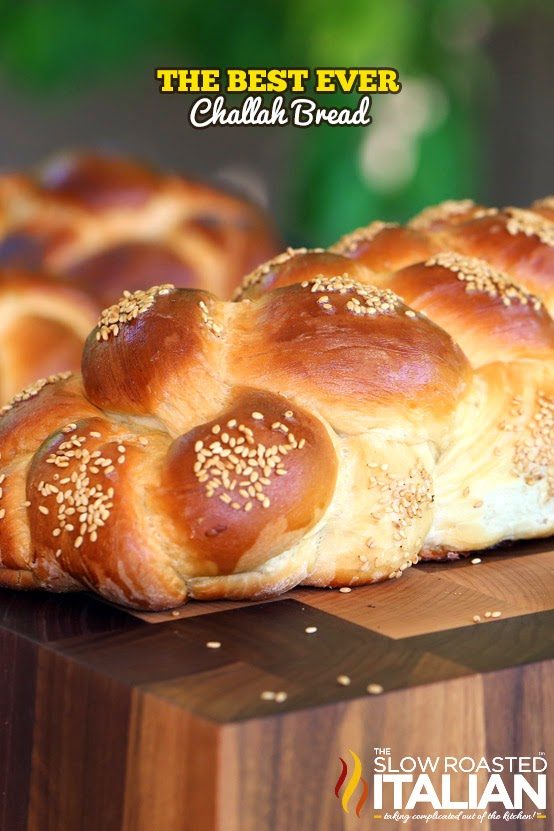
I love challah bread. I have been working on my recipe for challah for 3 years, always making a little tweak here or there each time I made it. Well, here we are with the finished recipe that has been tested 4 times and comes out perfect every time. I love that it is so versatile.
I have made this recipe in bread pans, on a sheet as a rustic looking loaf, as dinner rolls/buns and of course the classic challah 6 braid (like you see above). It’s by far my favorite bread recipe ever and we have made quite a few.
If you haven’t had the pleasure of enjoying challah bread before, it is an unbelievable rich egg bread. This recipe is sweet, tender and undeniably the best bread ever! Honestly every time I make it, I prepare the majority of it for gifts because our family loves it so much. It is truly amazing!
You are going to love it. We have actually been using challah for our favorite French Toast Casserole for years now. Always amazing. Enjoy!
With love from our simple kitchen to yours.
Get Free Recipes Sent to Your Email
Do you ❤️ TSRI? Don’t miss another recipe!
Subscribe to The Slow Roasted Italian by email to receive new recipes in your inbox!!
Table of Contents
Other Easy Bread Recipes
Best Ever Challah Bread
Ingredients
- 1 1/2 tablespoons active dry-yeast
- 2 1/2 cups warm water, 110-120°F
- 1 cup good honey
- 12 tablespoons unsalted butter, 1 1/2 sticks, melted (divided)
- 1 large egg
- 4 large egg yolks
- 1 tablespoon kosher salt
- 8-9 cups all-purpose flour
- 2 eggs +2 tablespoons water, egg wash
- optional sesame seeds
Instructions
- In the bowl of a stand mixer* add water and honey. Sprinkle yeast over top and swirl with spoon or fingers to combine. Allow to sit for about 5-10 minutes while the yeast bloom and become aromatic.
- Add 8 tablespoons melted butter, eggs, salt and 6 cups flour. Mix on low, using dough hook, until smooth. Add remaining flour 1 cup at a time until soft dough ball forms (I use the entire 9 cups). Turn to medium and knead for 5 minutes. Your ball of dough should be tacky (not sticky). If it is sticky, add a little more flour 1 tablespoon at a time until it becomes tacky (does not leave dough on your fingers when you touch it).
- Turn onto a floured counter top; knead about 10 turns. Wash out bowl and place 1 tablespoon melted butter inside. Place dough into bowl, turning once to grease top. Loosely cover with plastic wrap (that has been sprayed with non-stick spray) and a cloth over top and let rise in a warm place until doubled in size, about 1 hour.
- Prepare egg wash. Set aside. Grease 2 cookie sheets with ½ tablespoon butter each.
- Punch dough down and divide in four. Form into a ball and set aside. Working with one dough ball at a time; roll dough ball into a log and cut into thirds. *Then, cut each third in half if doing a 6 braid.
- Braid into 4 loaves and place on greased cookie sheets. See this fabulous video tutorial for an easy 6 braid https://www.youtube.com/watch?v=22p3wIHLupc
- Brush with egg wash. Sprinkle with seeds if desired.
- Cover and let rise until doubled, about 60 minutes. Preheat oven to 350° and place baking racks in the top and bottom 1/3 of oven center of the oven. Bake for 40 minutes or until golden brown.
- If bread starts to brown too quickly, cover with aluminum foil. When bread is removed from the oven, brush with remaining butter. Serve and enjoy!
Donna’s Notes
Nutrition
All nutritional information is based on third party calculations and is only an estimate. Each recipe’s nutritional value will vary depending on the ingredients used, measuring methods, and portion sizes.

Disclosure: Posts may contain affiliate links. If you purchase a product through an affiliate link your price will remain the same and The Slow Roasted Italian will automatically receive a small commission. Thank you for supporting us, it helps us keep creating new recipes.





These bread looks amazing, great directions.
Awesome! I can't wait to try this one! There used to be a sandwich shop around here that used different types of bread (including challah from the local Wal-Mart). My mom was obsessed with Wal-Mart challah after that. I can't wait to try it for her.
I was so excited to fins this recipe ~~the best one i have found to date for Challah ~~would you happen to have an equally great one for Brioche ???
I do not have one yet, but keep watching. Its on the list for this summer. Thanks for reading and we look forward to hearing from you again.
This is a really good recipe EXCEPT for the instruction to cover the formed loaves with plastic wrap and a towel to rise. The plastic wrap does nothing but stick ( badly) and then tears the loaves up when removing. I'm a seasoned baker and my senses told me otherwise but I followed the instructions anyway. Grrrrr
you have to spray the plastic wrap first.
i just made your chuallah bread today and i have to say the taste is the best i ever made i have tried other recipes but this is the best .im taking two to thanksgiving dinner with friends and i kept two for us my husband ate a half loaf while it was still warm.
Thanks so much, Judi!! We are so happy you enjoyed it!
I MADE TOAST WITH THE BREAD THIS MORNING AND WAS SO GOOD.VERY EASY TO MAKE AND I WILL BE MAKING IT A LOT
It may be a great bread, but it isn’t really challah. Challah is first and foremost a Jewish Sabbath bread, to go primarily with a meat meal, and would never include butter, due to the rules for kosher food. And margarine is never the same.
Hi Iris,
We certainly appreciate and respect your religious insight on the recipe’s origin! We do not typically create our recipes specific to any religious or dietary guidelines, but always encourage our readers to adjust the ingredients if desired. We hope you’ll try the recipe using your desired ingredients. 🙂
TSRI Team member,
Becca
Can you make a half recipe of this or freeze the loaves?
Do you think this would work in a bread machine??
Hi Robin,
I think halving the recipe will be fine, and if it’s wrapped tightly in plastic and foil, you should be able to keep them in the freezer for a month or two. We haven’t tested the recipe in a bread maker, so I can’t answer that question – but let us know how it turns out if you try it!
TSRI Team member,
Becca
Because of your recipes I absolutely love making my own bread! It’s so rewarding once it’s finished and tastes as good as this one does!